Bowling isn’t ballet, but alignment, step cadence, knee bend, and balance are critical physical factors that determine a player’s performance on the lanes.
The bowling approach can be compared to the movements of a ballet dancer: smooth, effortless, graceful, and, above all, natural and synchronized. The approach becomes the determining factor in maintaining a free armswing, proper balance, precise positioning for maximum leverage, and a fluid follow through. More importantly, a rhythmic approach can overcome minor deficiencies that otherwise might become disastrous.
A proper approach consists of several basic principles: stance; alignment; the length and cadence of steps; knee bend; and balance. One of the most frequently asked questions we get is, “How do you prevent sliding four to five inches left of the previous step to “fill the hole”?
We will address this in another article. First of all, you can’t start your car without a key. You can’t enter your home without opening the door. Let’s face it, we usually take the first steps of a task for granted. In bowling, if you take your approach for granted, your game suffers.
One of the most important bowling fundamentals is a solid, rhythmic approach. A solid approach is the catalyst for setting up quality shots without undue strain or exertion. When you are secure in your approach, you have a key fundamental in your bag that enables you to perform consistently, shot after shot, game after game, year in and year out.
Numerous players on the PBA tour have utilized their graceful approaches to increase their earnings from modern bowling balls, which explode on contact with the pins. By blending exact timing with average finger rotation, such players as Patrick Allen, Parker Bohn, Chris Barnes, Norm Duke, Doug Kent, Wes Malott, Mike Scroggins, Pete Weber, and Danny Wiseman have all achieved remarkable success.
Although some of the aforementioned players personified strokers in the textbook fashion, power players past and present have also demonstrated the advantages of good footwork. All-time greats like Bill Lillard, Carmen Salvino, Pete Tountas, and Harry Smith all planted their slide step firmly and then patiently released the ball at the proper point. Conversely, Marshall Holman confounded bowling scholars with his unique method of execution, which he unleashed during his slide. That slide continued after the ball was well past the release. Yet, he threw one of the most devastating strike balls in the history of the game.
In recent times, Danny Wiseman has gained star status with a similar approach. Although his “slide release” is not as pronounced as Holman’s was, it is nevertheless performed in an unconventional manner. They both hold the ball low from a crouched position.
Most star performers have excelled using conventional four- and five-step approaches, but some have defied the norm and applied six or seven steps. Brian Kretzer has used as many as eleven steps. How many steps constitute the most fitting approach? The answer is incredibly simple: however many feel comfortable.
The sliding step is extremely important. It is the panacea for correcting imbalance, whether you are a four-step, five-, six- or seven-step bowler. The sliding step epitomizes the old golf adage, “It’s not how you drive, but how you arrive”. It matters not if you have a drift, either left or right, the sliding step MUST be in line with the previous step. We will illustrate how this can be done properly later but first, let’s begin with the entire process of a quality approach.
The following guidelines apply to the four-step approach (use opposite instructions if you’re left-handed).
First step
In a four-step delivery the first step should be shorter than the extended point of the arm in the pushaway. This means that any step beyond the extension of the pushaway will impede the free-fall of the ball in the downswing. Your body weight should be above your feet. To use gravitational force, the weight of the ball must be beyond the first step. Consequently, a short first step becomes the catalyst for a free armswing. Steps should be heel-to-toe; that is, the heel makes contact with the approach, followed by the toe, in a natural walking step.
Second step
The second step should increase in length. As the ball descends from the pushaway, pull and extend the non-bowling arm back and away, forming an airplane wing. This acts as a counterbalance and maintains the shoulder and body in line with the intended direction of the delivery. At this junction, the ball should be at the bottom of the swing, slightly past the knee, and primed for its path into the backswing. It must be noted that many contemporary players, particularly those who employ the power game, extend their non-bowling arm forward, thereby opening their shoulders for “loading up” their release. They usually drift leftward with open shoulders, then realign to the target before releasing the ball.
Third step
Several instructional books suggest increased lengths after the first step throughout the approach. At the risk of agitating highly regarded instructors, many of whom are my friends, I am opposed to this philosophy. Although the third step is generally acknowledged as the power step, it is also referred to as the trigger or pushoff step. At any rate, all these terms allude to the main objective and importance of the third step. All convey the central notion for initiating a driving force.
To accomplish this important maneuver, you must make this step SHORT and RAPID. It is virtually impossible to push off on a step that is beyond the upper body position. The primary role of the power step is the beginning of a forceful surge into the slide. To achieve the desired surge going into the slide, use a short, rapid skip step, simulating a sitting position. A short step will allow you to assume a lower position that places your third step as a sturdy base to power into the slide. This suggestion is just not based on theory.
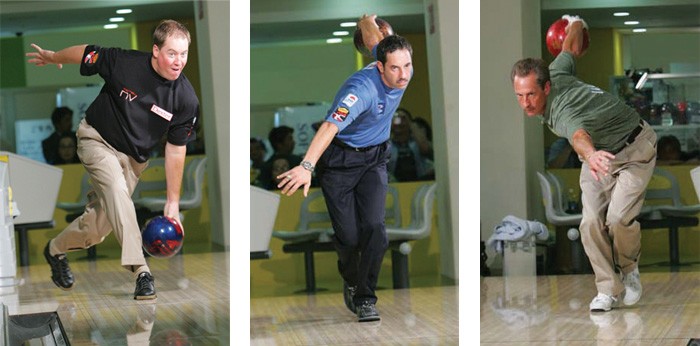
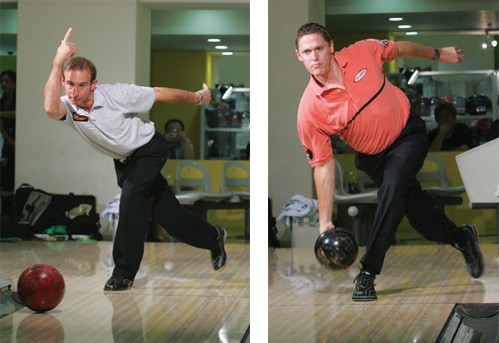
Short power steps have been the trademarks of every successful bowler, from older stars like Earl Anthony, Don Carter, Don Johnson, and Dick Weber to modern players like Patrick Allen, Chris Barnes, Norm Duke, Parker Bohn, Pete Weber and Walter Ray Williams (photos at right). Marshall Holman’s power step was barely over 18 inches. These assertions can be substantiated through PBA tape replays that are available to anyone with dissenting rebuttals.
Knee bend
The knee bend is an important component of the third step and a vital element of quality shot-making. There is a great misconception regarding knee bend. I can’t begin to tell you how many times I’ve heard someone say, “Bend your knee on your slide.” This phrase seems like constructive advice and is far more difficult to perform than it is to convey. Doesn’t it seem arduous to bend your knee from an erect position with a weighted object in your hand? How can anyone descend to this level abruptly and maintain any semblance of balance?
If you find it difficult to descend rapidly, you should begin your stance with slightly bent knees, gradually descend on the second step, and assume a sitting position (or dropping your hips) on the third step. You MUST bend the knee. Tilting the body to achieve a low position is counterproductive and will result in rearing up on the release. A proper knee bend permits a low trajectory of the release and is especially effective on oily lanes. In a well-executed delivery, the ball touches down on the lanes like a plane on a runway; seldom heard when it makes contact with the lanes.
Walter Ray Williams uses knee bend to execute a near-silent delivery. The only sound you hear in his release is the crash of the ball into the pins. Conversely, Ryan Shafer has achieved success with little or no knee bend, simply due to his short stature that allows him to release from a lower position into the lanes, a strategy that minimizes the bouncing effect of the ball.
Power step
The power step depicts a launching point that affords maximum leverage. It must be applied in a refined manner. The concepts of smoothness and force are somewhat contradictory and a delicate balance between two factors is necessary for an ideal delivery.
When you deliver a weighted ball from one side of your body to the other, you are prone to imbalance, which other forces must counteract. Moreover, you must accomplish this with the body in motion. Although your arms and legs automatically function in an alternating manner, you must coordinate the steps precisely to create an ideal release point.
Unlike the heel-to-toe steps in the first two steps of a four-step approach, the power step is initiated with a strong, deliberate push off the ball of the foot, which thrusts your body into the slide. It creates the force and thrust of the hand, which permits acceleration through the shot without muscling through the forearm. The power step also propels the body into a position to wait for the ball, thus allowing the weight of the ball to be balanced through the swing. This prevents an early swing that would force the ball beyond the sliding step. REMEMBER, the secrets to a great power step: make it quick and short, descend to a sitting position, then push off.
Slide
This is the crux of our original point of correction. How do you prevent sliding four to five inches left (for right-handers, opposite for lefties) of the previous step, creating a gap, and necessitating “filling the hole”? To negotiate an ideal slide, you must remember this: the slide step does not advocate the heel-to-toe method. A well-executed slide is initiated on the ball of the foot and braked on the heel.
One basic rule must be followed, regardless of the number of steps taken. The slide MUST conclude directly in line with the previous step (“Slide Lane” photo). Any step that is to the left (right for lefties) of the previous step will shift the weight away from the center of the body and create an imbalance. It will place the release too far away from the ankle and result in loss of leverage. This can also result in a pulled shot. Therefore, the slide step must be in line with the preceding step. This counterbalance averts “falling off” the shot and keeps the armswing close to the body, thus preventing a “flying elbow”.

A righthander’s sliding step should slide in line with the third step, which keeps the ball well into the body.
One of the major sliding mistakes made by amateurs and pros alike is the position of the toe and heel in relation to the target. Reactive bowling balls have afforded contemporary power players the opportunity to drift leftward on the lane and realign to the target area. A quality shot can be delivered in this manner provided the toe of the sliding step and shoulder are aligned with the desired target.
Superstars like Chris Barnes and Norm Duke and several others subscribe to the ideal approach of “straighten out and slide right”…with toes and shoulders pointed directly toward the target. If you are experiencing difficulty in sliding properly, you can correct this problem by rehearsing simulated slides without the ball.
Take your stance, initiate your approach, slide and force your heel and toes in the direction you seek. You can further experiment proper sliding by placing tape on the approach in spots that will set you in the proper position for an ideal, balanced, and well-leveraged delivery. Repeat these drills until they become natural. Remember, my choice advice, “Repetition becomes habit, good or bad.”


